Monday, October 15, 2012

Steampunk Eggs

 Just look at this dashing fellow! Light bulb top hat, sophisticated mustache, his watchband belt.

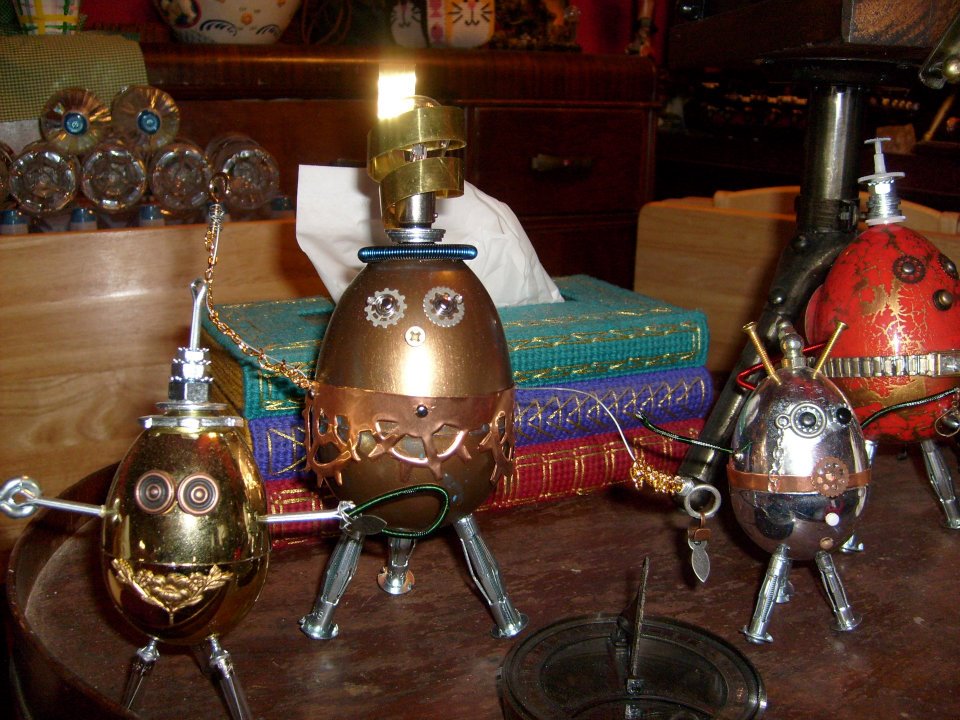
His body is a medium sized Easter egg, metallic gold. This cute guy, and the others I made, though a little on the pain in the butt side, are neat additions to my attempt to make every holiday steampunk.

In order to make these, you have to have these basic tools: precision screwdrivers (the really small ones), glue - I used tacky glue because sometimes superglue will eat plastic, and wire.

The rest is up to you. On the guy above I used some copper tooling sheets, a burnt out car headlight light bulb, wire, and old watch with a stretch band, wire, alligator clips, jewelry findings, and hollow wall anchor screws for the legs.

I did the legs first. I decided how I wanted him to stand and marked the spots with a marker. I then used a Philips head precision screw driver to make the holes. This is the tedious part, drilling the holes for the arms and legs. I tried using the dremel, but the eggs cracked. :D

Once I had the holes drilled, I screwed the legs in, checking that he was able to keep standing on his own. I glued the screws in place inside the egg, using a couple of coats to make sure the legs would not slip out.

I then set to work on the arms. I used pieces of wire covered with wire coils. I attached the alligator clips to one end. On the other end I attached small hooks and screwed them into the holes I made for the arms. Once I attached both arms, I looped wire inside the egg, securing both arms in place. This allowed me to position the arms how I wanted. (Careful not to wind the wire too much. You could bend the egg inwards, distorting the shape or cracking it.)

After you do the arms and legs, let your imagination run wild. On the first egg, I wrapped tooling copper around the light bulb to form a top hat.

<--- On this guy, I drilled a hole in the top on his head and threaded a small screw inside to hold the group of washers I glued together. I attached the light bulb. I then Screwed two small screws off the wither side of his head and attached the wire coil you see.

(note the small hot air balloon made out of a small Christmas ornament, clay, and wire.)

^^^ The guy above was a little more difficult to use. He was made out of thicker plastic that was hard to drill holes in. If you have the patience, then go for it. If not, find thinner eggs to work with. There are all kinds of Easter eggs out there these days. I painted this one silver - he was originally blue. The gears are held on by small brads.

Here are a few more I did. Just have fun and use your imagination. There is not wrong way to make these little guys. They do take a little time, especially when you glue the mustaches and other little bits and baubles on. In the end you will have a unique Easter decoration, or, if you're like me, a year round conversation starter.


Haunted Dollhouse

     Halloween is always a fun time of year around my house. There is the annual Halloween party where people are forced trek through the property's winding trails and open areas to encounter an array of ghosts and ghouls. Guests usually compete in a scavenger hunt, every years bringing something different to the plate.

     One year I decided to make a haunted dollhouse. I had the thought for several years but just never got around to it.But then I saw a dollhouse kit at Hobby Lobby for only $40. I had a coupon, so I thought, why not.
     The kit was easy to work with. I first covered the inside of the house with scrapbook paper. I chose black, white, and grey papers. I covered the floors, walls, and ceilings with the paper. I painted the little odds and ends for the outside: window and door frames, gables, and porch area before I finished putting the house together. I painted the rest of the outside of the house once it was put together. 

    
     I added the furniture and lights once everything was dry. I painted the two shelves - they were unfinished dollhouse furniture I found at Micheal's craft store. I made a cover for the mattress as well as a comforter to fit with the colors of the house.
    The little monsters under the bed are small pompoms with small googly eyes glued on. Behind the bed, in the little alcove, is a dragon guarding his hoard.
     In the bathroom I placed a Halloween figure I found. It was perfect: a vampire taking a bath.
     In the living room I placed a sofa and chair. The little fairy is one I found at the local dollar store. I painted her top red - it was plastic, and fashioned a skirt out of left over fabric. Beside her is a broom and a small cauldron made out of polymer clay.
          For the outside of the house, I made a chain of ghosts out of cheesecloth and cotton balls. Just place a cotton ball in the middle of the cloth and tie it with some thread. Then use a marker to add eyes. I used pumpkin foil garland to tie the ghosts together and hung it off of one of the ornamental tiles on the roof.
     I stung cobwebs all over the outside of the house, making sure to leave the back open so people could look inside. The little crates are from the werewolf and other creatures that I found in the Halloween aisle in the supermarket. Each crate held a monster - the werewolf is visible on top of the house.

     The house sits on a piece of plywood. The pumpkins are made out of Polymer clay. I wadded up tinfoil, then covered it with clay. I made grooves to shape them like pumpkins, and added green stems. By using the tinfoil, the baking time was only 15 minutes, and they don't weigh very much.
     The rest are Halloween figures and pieces that I had, just re-purposed for the house.

     Since these photos were taken, I've added a couple of hay bales, pumpkin lights, miniature grim reapers, and a little black cat.